How to troubleshoot Android Wi-Fi connection problems
Android smartphone and tablet users now abound in the enterprise, making Android Wi-Fi connection troubleshooting a key element of enterprise wireless network connection management.

In our wireless network troubleshooting tip, we explained how to debug physical, AP, router and Windows connection problems. But what if you're having trouble with Android Wi-Fi connections on a smartphone or tablet? Check out these step-by-step tips for Android device Wi-Fi connection troubleshooting.
Step 1: Verify AP and router settings
Start by verifying that a wireless access point (AP) or router is nearby and actively offering Wi-Fi service. Always start here, using another Wi-Fi client to determine which is the likely culprit, the network or the client. If multiple clients are unable to connect, follow instructions in our wireless network troubleshooting tip to debug probably AP or router or upstream network problems. Otherwise, proceed to step 2 to debug the affected Android client.
Step 2: Verify wireless adapter
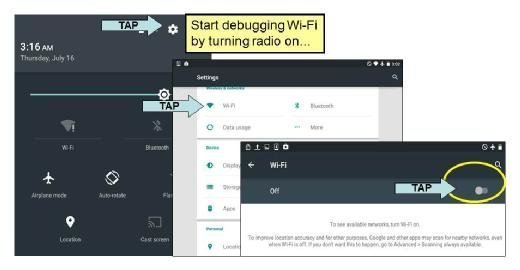
Verify that your Android Wi-Fi adapter is enabled. Before going any further, make sure that your Android device's Wi-Fi radio is not in Airplane Mode and that Wi-Fi is on and ready to connect. Tap Settings > Wireless & Networks > Wi-Fi as shown in Figure 1.
If Wi-Fi is off, tap the slider to turn Wi-Fi on. When Wi-Fi is on, a signal indicator appears at the top right corner of your home screen. Properly connected Wi-Fi takes precedence over mobile broadband, but it can be helpful to disable your device's mobile network connection while debugging Wi-Fi.
Step 3: Check SSID and IP address
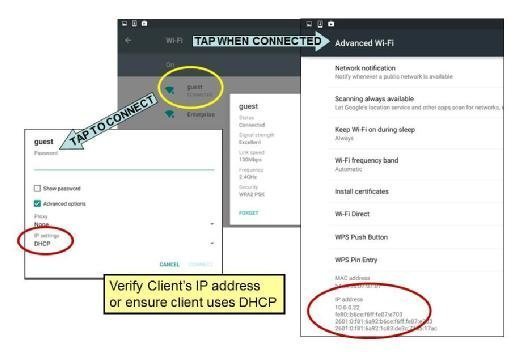
Verify your Android client is connected SSID and IP address. Return to your Android device's Settings > Wireless & Networks > Wi-Fi panel and tap Wi-Fi Settings. Find your network's name (SSID) on the list of nearby Wi-Fi networks.
- If your network's name is not on the list, the AP or router may be hiding its SSID. Click Add Network to configure your network name manually.
- If your network is on the list but Connected does not appear beneath its name, tap your network to try to connect. If prompted for a password or key (see step 7), enter it and tap Connect. If you repeatedly try but fail, go to step 7.
- If Connected already appears beneath your network's name, continue.

Business Critical Communication Capabilities: What’s Beyond Wi-Fi?
Learn about Wi-Fi’s shortcomings, the impact of its inefficiency and inadequate performance and why you may need to consider a new approach.
Download now
Note that whenever you're trying to connect an Android Wi-Fi client to any network name, status is displayed on the Wi-Fi Settings panel, in the row labeled Wi-Fi. When status is Connected, tap Advanced to view the client's assigned IP address.
- If a connected client's IP address is Static but not in the correct subnet (see our wireless network troubleshooting tip, step 3), forget the network and connect again, using the "Advanced" settings to choose DHCP.
- If a connected client's status reads Obtaining address for a long time, or your client repeatedly connects but then quickly disconnects, go to step 7.
- If a connected client's IP address is in the correct subnet, continue.
Step 4: Verify network connection with Ping
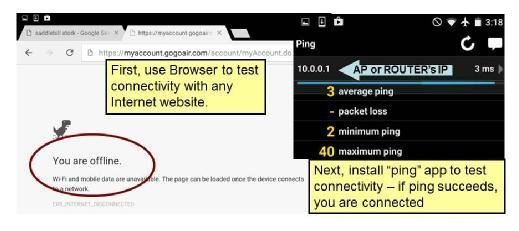
Once your Android Wi-Fi client has a valid IP address, use Ping to verify network connectivity. Most Android devices do not include a user-accessible ping app, but you can still verify network connectivity as follows.
- Start by using your device's built-in browser app to check Internet access. If you can successfully open or reload an Internet website page, congratulations: You are connected!
- If you get the error message The Web page at X might be temporarily down, you'll need to do more digging. Try browsing your wireless AP or router's Web admin utility (e.g., http://192.168.1.1). If you can open that page, you are connected to the network, but the network itself has a connectivity problem. Refer to our wireless network troubleshooting tip for additional hints.
- If you cannot browse your AP or router's Web admin utility or another Web-enabled device connected to your wireless LAN, you will need to troubleshoot connectivity another way. Use Google Play to download and install a free ping app such as Fing or IP Tools. Use that app to ping your AP or router's LAN IP address as shown below. If pinging your AP or router repeatedly fails, skip to step 5.
- If pinging your AP or router succeeds, ping any other wired or wireless LAN client that you wish to communicate with. If that ping fails, AP isolation may be enabled or the destination may be using a firewall to block incoming messages. Follow the instructions given in our wireless network troubleshooting tip, step 5.
Step 5: Wireless-specific connection problems
If your Android Wi-Fi client still cannot connect, get a valid IP address or ping any other system connected to the same subnet, it's time to look for wireless-specific problems. The AP/router and client must use compatible 802.11 standards. Please note the following:
- Newer Android devices have integrated single-stream 802.11ac network adapters. These Android Wi-Fi clients can be connected to 802.11ac, dual-band 802.11n, or 802.11a APs or routers -- all of which use channels from the 5 GHz band.
- Older Android Wi-Fi clients that have integrated 802.11bg or single-band 802.11n network adapters can be connected to an 802.11b, 802.11g or 802.11n AP or router -- all of which use channels from the 2.4 GHz band.
To determine which 802.11 standards your wireless network’s AP or router supports, look for “Wi-Fi certified” logos, or search for Wi-Fi certified products at the Wi-Fi Alliance website.
In general, newer APs and routers are required to provide backward compatibility with older generations of Wi-Fi, but data rate settings must still match. Once you have confirmed that your AP or router and client should be compatible, debug wireless radio settings as described in our wireless network troubleshooting tip, step 6.
Step 6: Check security settings
If a compatible wireless client and AP/router can "hear" each other but still cannot connect or exchange traffic, look for a security mismatch. The client must support the security mode required by the AP or router: Open, WEP, WPA, or WPA2. Unless a WLAN is open (i.e., unsecured), both endpoints must be configured with (or dynamically receive) identical keys to encrypt traffic between them. Compare security settings on your AP/router and Android Wi-Fi client and attempt to match them.
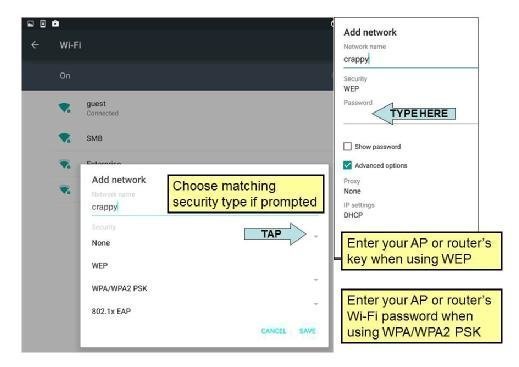
- To reconfigure the security parameters for any previously saved network, go to Wi-Fi Settings, tap the network's name, and then tap Forget.
- To reconfigure the security parameters for any other network, tap the name of the desired network or Add Wi-Fi network. When connecting to a listed network, Android automatically sets some parameters to match your AP or router and only prompts for parameters that it cannot guess, like WEP keys, passwords and 802.1X usernames. When manually adding a network, you will be prompted to enter all required security parameters.
- If your AP or router uses WEP, enter your AP/router's WEP key when prompted or tap the Security pull-down to select WEP and copy the WEP key into the client's Password field.
- If your AP or router uses WPA-Personal or WPA2-Personal, enter your router's passphrase when prompted or tap the Security pull-down menu to select WPA/WPA2-PSK and copy the AP/router's Wi-Fi password into the client's Password field. Hint: Capitalization counts; check Show password to detect any typos.
- If your AP or router uses WPA-Enterprise or WPA2-Enterprise, set the client's Security field to 802.1x Enterprise and continue 802.1X setup as described in step 7.
If you choose the wrong security type when adding a network, it may still be saved. You can change the password (or any other security parameter) associated with a saved network by tapping the network's name. However, it is often easier just to click Forget for any misconfigured network and start fresh.
Step 7: Check RADIUS settings
Ensure RADIUS is working. WPA-Enterprise and WPA2-Enterprise log the Android Wi-Fi client into the network and deliver encryption keys using an 802.1X-capable RADIUS server. Refer to our network troubleshooting tip, step 8, to check your AP or router's RADIUS settings.
Step 8: Check 802.1X EAP issues
If RADIUS is working but your Android Wi-Fi client's connect requests are rejected, look for an 802.1X Extensible Authentication Protocol (EAP) problem. Your client must support one of the EAP types required by your RADIUS server and must supply a valid login.
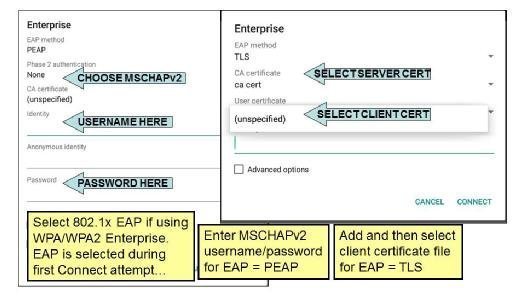
- If your RADIUS server requires EAP-TTLS or PEAP, set the client's Security field to 802.1x EAP, select EAP method TTLS or PEAP when prompted, choose a phase 2 authentication (e.g., MSCHAPv2 or GTC), and enter your username (identity) and password. MSCHAPv2 is commonly used with passwords; GTC is used for token authentication. For most networks, the anonymous identity field can be left blank. You may optionally choose a CA certificate to authenticate the RADIUS server.
- If your RADIUS server requires EAP-TLS, set the client's Security field to 802.1x EAP, select EAP method TLS when prompted, enter your username (identity) and select a user certificate from the pull-down list.
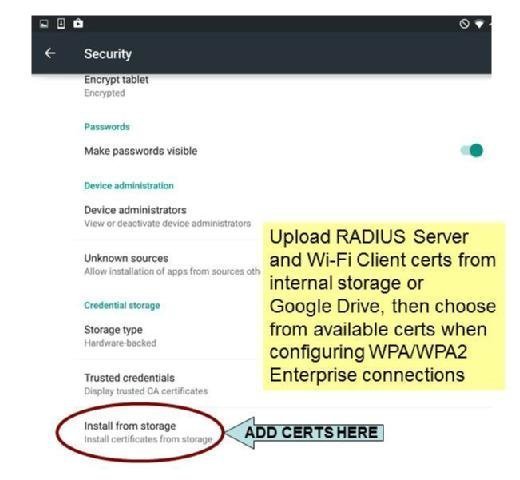
If the only entry in the list is unspecified, you must first add a certificate file to your device. To do so, copy a certificate to a storage location accessible from your device (see Figure 6). Hint: Email the file to yourself and save it to your device, or upload the file onto Google Drive.
Looking for more troubleshooting tips?
See Lisa Phifer's step-by-step instructions on troubleshooting wireless connection problems and iPhone and iPad connection problems.
Next, go to the Settings > Security panel. Tap Install from storage and choose the storage location of your certificate file. You may be prompted for a password to unlock the file. The certificate will be loaded into your Android device’s credential storage and should now appear as an option when selecting an EAP-TLS client or CA/RADIUS server certificate.
- If your RADIUS server requires any other EAP type, use an Android-compatible Mobile Device Manager to configure a wireless network connection with the appropriate matching settings. When using WPA or WPA2-Enterprise, this includes not just adding the wireless connection, but adding any necessary certificates to the Wi-Fi client.
Step 9: Check for intermittent network connections
If your Android Wi-Fi client still cannot seem to connect to the network, seems very slow all the time or disconnects frequently, you may be experiencing lower-level wireless problems. Refer to our network troubleshooting tip, steps 10 and 11, for further instructions. To facilitate debugging, you may also want to install a few more free apps. For example, see the following:
- Ookla SpeedTest -- Handy for measuring slow connections
- Wi-Fi Analyzer or InSSIDer -- View channel, signal/noise, interference, and more
- Fing -- Try to reach other clients on your own network.